
As you may or may not know, this year sis and I are extremely ‘rajin’ (hardworking). We bake our own Chinese New Year cookies!!! We’ve made 4 in total. Not bad eh?
Well there’s pineapple tarts, oatmeal crispies, margarine cookies and the 4th one which I’m going to share with you is Kuih Kapit aka Love Letter.
It was 3 years ago in 2006 that we last make them. At that time grandma helped us with everything. When I read back my kuih kapit post I was quite lost. At that time things were too messy and I didn’t have time to write a proper recipe.
This time I purposely asked grandma not to come to our house. One is because I know she will definitely help out and we don’t want that. Second is because we want to learn making kuih kapit by ourselves from scratch.

I started making my batter at 8.15am. Phoned grandma a couple of times asking her some crazy questions although I already had the recipe on hand and had discussed with her the previous day. I would say that my recipe note has incomplete methods (rather than an incomplete list of ingredients).
I’m sharing with you guys my grandma’s kuih kapit recipe and method IN DETAILS so that I will not forget them and you guys can try making them next CNY.
NB. Not many photos to offer here as our volunteer (Mr Dad) decided to stay in the house. Not even a decent photo of the finished kuih kapit!!!! HOW? HOW? I’ll show them on CNY la. Quite a lengthy post. Just look at the photo unless you’re interested to follow this recipe.
So here goes…
Recipe was updated on 28th Jan 2018.
Ingredients:
600g all-purpose flour (1 kati)
600g caster sugar (I used 550g) – (1 kati)
75g rice flour (1/2 cup)
3 grated old coconut
12 eggs (8 whole eggs + 4 egg yolks)
room temperature water
Note: 1 kati = 600g
Directions for Love Letter Batter:
1. Prepare 2 empty containers. Place the grated old coconut (bought mine from an Indian sundry shop) into one of the containers. Begin by adding 1 cup of water. Press the old coconut for say 2-3 minutes with your hand. When you notice there’s coconut milk coming out from your hand during pressing, then it’s time to prepare the first batch of coconut milk/juice. In Malaysia we called them santan. Reason for pressing the coconut is to draw out the juices.
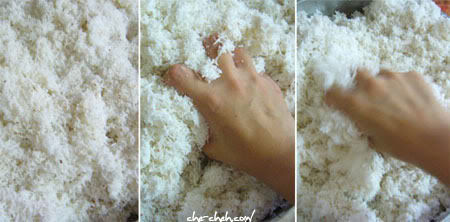
2. Place some grated coconut into the cloth strainer. Squeeze ’em clean to collect the juices in the 2nd container. Repeat until you’ve squeeze all the remaining grated coconut. Now you have your first batch of coconut milk. Place them aside.
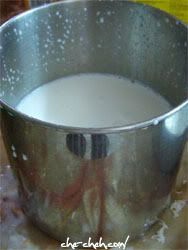
3. Now add 2 cups of water into the freshly squeeze grated coconut. Repeat step 1. You need to press the coconut and so on. Then repeat step 2. Bring out another new container and gather this 2nd batch of juices. Place your 2nd batch of coconut milk aside.

4. Repeat the above with 4 cups of water. Remember to add extra water if it’s too dry. Press, squeeze and now you have your 3rd batch of juices. Put them aside as well. Remember which juice is from the 1st batch and so on ya.
5. Next, in a bowl sieve the flour and rice flour Add sugar. Put them aside as well.

6. Whisk 8 whole eggs + 4 eggs yolk (you can keep the egg white for other cooking) in a bowl until well blended. Sieve the whisked eggs as we don’t want any particle in the batter.
Recipes using egg white: pandan chiffon cake, pistachio macaron and mango financiers

7. Now it’s time to MIX ‘EM ALL UP.
8. We will need the dry ingredient (flour, rice flour, sugar) bowl as the base. Now take the 1st batch of coconut milk and pour all into the dry ingredient. Slowly using your hand (old-fashioned way ma) stir the batter for awhile. Then add the whisked egg little by little. You don’t want to pour all as it can be difficult to stir the dry and liquid nicely. I guess you can use an electronic beater. I have never try it so I don’t know how the end result will look like.
9. Finally after you’ve pour all the whisked egg into the batter and the batter is well blended, it’s time to bring out your 2nd batch of coconut milk.
10. Now this is the difficult part. You have to judge yourself whether this batter is thick. If yes, pour some of the 2nd batch coconut milk and stir again. If you judge the batter is okay, then put the batter through the sieve.
Let’s go light up the charcoal after that!!! My grandma said the batter should look like the waffle batter that I made the other day. Hehe so agak-agak lo. You’ll find out later whether your batter is thick when you’re doing the baking process. No harm just add coconut milk. That’s why we need 3 batch of coconut milk (for emergency case).
By the time I finished all the above it was like 11am already. Fret not. I dilly dally around… that explained the huge preparing time.
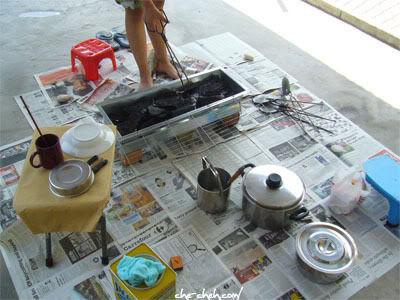
We bake our kuih kapit with charcoal. Have you seen an electric kuih kapit maker? I’ve not but I heard they EXIST!!! Hahaha… Of course it’s simpler to use an electric maker but hey where’s the fun ya?
Things to Prepare for Baking Kuih Kapit Using Charcoal, Che-Cheh’s way
1. Kuih Kapit Molds
– Oil the molds & handles (sort of like cleaning ’em) with unwanted cloth before starting.
– We use 4 molds. All depends how a person/how many person can control ’em.
– Buy nice designed molds so that your kuih kapit will turned out beautiful. Hehe
2. 3 dinner knives/small knives
– 2 of ’em for folding the kuih kapit.
– 1 of ’em for scraping the ‘extra skin’ from the kuih kapit mold + peeling.
3. Some oil in a cup + a chopstick wrapped with cloth at one end
– In case the kuih kapit is sticking to the mold during baking, you need to oil them after that.
4. A heavy duty plate/bowl whatever
– To weight down the kuih kapit after folding.
5. An empty tin box with some brown/tracing/baking paper to line the side
– To store your kuih kapit!!!
– Normally we prefer to keep kuih kapit in tin as oppose to plastic because tin is more air-tight.
6. 1 bag of charcoal
– Get an extra bag for backup.
7. Plenty of newspaper (so that you won’t have to scrub the floor after a tiring day)
– There will be oily floor I assured you.
– With newspaper, we just clean ’em with water.
8. BBQ stove
9. Stool
– Choose a soft stool ya or your butt will…. OUCH OUCH OUCH
10. A small table
– For folding action!
11. Plenty of helper
– We only have 2 people working on this. One in charge of baking while the other in charge of folding and storing.
– Of course the one in charge of baking has more fun! 😛
12. Drinking water + fresh fruits (orange is good!)
– You’ll get dehydrated very quickly. Also eat some fruits whenever you have free hands. It’ll sooth your body from the heat.
13. Hardware gloves
– To protect your hands when manning the kuih kapit molds. You gotta hold, lock and unlock the molds 400+ times! Get one with medium thickness.
14. Fan
– Oh it’s hot man!
15. Fire starter
– The most important ingredient!!!!
On Baking Kuih Kapit Using Charcoal

1. The first thing we do before pouring the kuih kapit batter into the mold is to heat the empty kuih kapit molds on the charcoal. When it’s hot enough we oil the 2 sides (mold) and reheat again.
2. After awhile we will pour the kuih kapit into the mold (1 side only), allow the extra batter to drip off and place the mold on the BBQ stove. Remember to ‘lock’ the mold handle.
3. There will be hardened batter surrounding the mold. Now take the knife and scrap them off. Return the mold to the fire.
4. After awhile turn the mold to the other side. From time to time have a peek at the kuih kapit. Remember to keep an eye on it. When it’s golden brown then it’s time to peel off the kuih kapit. Hand it over to your helper.
5. The kuih kapit folder must quickly fold the kuih kapit from round shape into 1/4 circle shape. If you don’t act quickly the biscuit will be hardened.
6. We usually throw away the first kuih kapit. The first one is something like cleaning the mold. Remember the heavy plate? Place it on top of the folded kuih kapit to weight down the cookie. Leave it for awhile. You can also use two knives to weight it down.
7. Now make your second kuih kapit and try to taste it. Is it too hard? If it is then add a little bit of the remaining coconut milk that you pressed earlier into the batter and stir well. I can’t tell you how much to add as this is all estimation and depends on individual liking. If it is too thick, of course you must add the coconut milk. If it’s just the right ‘thickness’ that you like then okay lo. Some people (like me) like thicker texture. I don’t like those thin texture where you bought outside. The moment I hold it the biscuit will break into pieces.
8. In the later stage, remember to check the batter. After sometime it can become thick. So remember to stir them from time to time and if it has thickens, add coconut milk. Also have a lid to cover the batter.
So there… it’s finished!
In our case, we started lighting the charcoal at around 11.40am. We finished the 1 kati batter at 5.30pm. 6 hours plus of hard and enjoyable work. This recipe yield around 250 pieces (inclusive ~20 pieces in Chester’s stomach, my sis’ stomach, my stomach)
When I make it again recently (27th Jan 2018. Tsk have not make this for 9 years already), it took me and my sis nearly 10 hours. Our inexperience handling the charcoal heat was the reason why it took longer this time. In total, we made about 200 pieces. This time our kuih kapit is thicker.
How To Clean & Store Kuih Kapit Molds After Completion
1. DON’T WASH IT WITH WATER!!!
2. Use oil and unwanted cloth to clean the molds (inside and outside surface, and the handles… basically everything).
3. Wrap the kuih kapit molds with newspaper and store in cupboard. The next time you want to use it, oil it back. 😉
p/s: This is my grandma’s recipe. So the directions of making them is kinda old-fashioned such as using hand to stir, estimation of batter liquidity and so on. Therefore proceed with your own risk. But don’t worry la. My kuih kapit turned out fine without grandma’s help (although they’re a bit thick). 🙂 But hey I like ’em thick as oppose to those you buy from outside.
37 Comments
Wow, that looks really complicated. It makes my head spins just from reading about it, let alone making it myself. But good job, gals. I’m sure these will taste even yummier since they were made with extra love and effort. 😀
Wow… that’s a huge project! But I wanna eat la…. :devil:
Looking at today’s economy, it’s better to make own cny cookies than buying them. Very pricey these days.
Looking at your photos reminds me of the good ol days making cookies with my late grandma.
Btw, why didn’t know the ‘fruits’ of your project geh? Where’s the kuih kapit?
wah, u still using this traditional way ar :hypnotized: …now got electronic one already…makes work muchy easier
:kowtow: for your hardwork!!!
Nice!! I miss doing all this… 😛
:drool: :drool: :drool:
wah!! terraaaaa!!!
my grandma used to make that…and i think they used to make kuih bahulu with charcoal stove or something as well…terra menerra! homemade always extra special hor, especially made with traditional methodS!
MisSmall, funny thing is… this was the first time I didn’t feel complicated at all. Maybe because only me and sis. So less hu-ha.
Neo, wait till CNY la… then I open the tin.
Hcfoo, oh I felt nostalgic too when making it. Make me miss the good ol’ time. Ohh I lupa take photo of the finished kuih kapit. :tongue:
Annant, hehe as I wrote in the post ‘where’s the fun of using electric one’.
Xin, ohh terima kasih :kowtow:
Angie Tan, then you must make this next CNY. I give you this challenge. Haha
Wuching, I know… you only know how to eat. Eh didn’t go to Australian Open meh? Get me some autographs la. :devil:
FeR, my grandma used to make kuih bahulu, kuih bangkit with charcoal too… But if I’m going to make it I will use oven. Hehe Oh yeah extra special. Ada ‘kam ching’
Girl, you remind me of the days where my grandma, mom, aunts and the young ones (as gophers la) will get together and make CNY goodies. And being the gophers have incentives – extra goodies for the stomach!
WOW! I want to make Pineapple tart, got recipe? plzzzz~
Dawn, oh yeah… at that time we will do it at night. So it’s like we have slumber party at the porch. Haha
Vhanded, google for Kuali Pineapple Tarts. My sis follow that one.
wah!!!! :kowtow: i used to help my grandma too but that was many CNYs ago. it was HARD n HOT work but OH so worth it! 🙂
Yvy, hehe :blush: Good ol’ times ya. Perhaps when your kids are older, your mom can show them the fun of making kuih kapit. 🙂
Wow! So much hard work just to make that kueh kapit! If I do this, sure get fever cos dehydrated and very hot for me! I think I tried it once before when I was in secondary school – I got sick after that! So now, prefer to just spend some hard earned money buying it, no need to make myself : )
Foongpc, hehe looks hard but it’s quite easy. I actually enjoyed doing it. Ah yes drink lots of water. 🙂
Hi Che cheh, know where I can buy good moulds? Will give your recipe a go. Just ate some from penning with new twist, they put some chicken in them before folding n it’s actually very nice. Give it a try next time
Sorry didn’t edit my message before submitting. Ha ha! I meant to say from penang and it’s chicken floss. Now it makes more sense.
Hi Susu,
Where are you from?
If you’re from Malaysia, you can get the kuih kapit molds at most baking supplies shops. I think I even saw Giant selling them.
There’s a kuih kapit version that uses laksa. Seems very interesting!
I’m from kl. Thanks for info. Will check giant out.
Welcome!
Do shop around if you’re looking for nicer patterns molds.
Also shops selling Chinese bowls and plates sometimes carry very beautiful kuih kapit molds.
Do u know where to buy the empty tin like the Milo size, need it to keep the kuih kapit.(klang valley or Penang area) tq
Hi Joanne, I don’t think you can find these tin for sale anywhere. Usually either we collect ourself or ask friends/neighbors. If you’re looking for plastic containers, there are plenty in baking supplies shops.
Hi Che Che,
Thanks for the Kuih Kapit making process, very informative! Let me know when you likely gonna make kuih kapit again, I like to be part of it 🙂
Hi Alice, you’re welcome.
I do saw the kuih kapit cooker the KINTA AEON and Ipoh Parade during my holidays to Malaysia for Raya a months ago….look like toaster sandwich cooker. Is not that bad RM119.00 around that price or maybe RM145.++ Just have a peek…will buy it when I come back for holidays again…
Oh really? Funny I live in Malaysia and I’ve only encountered the kuih kapit cooker once. Can you believe that? Haha
Dear Che-Cheh,i wanted to learn to make kuih kapit next CNY.never do it b4 or not even helped.i saw ur recepi 1kati flour,can i know what flour?i m fr Penang n am a hokkien.Thank you very much.
Hi Lay Peng,
Flour is plain flour or tepung biasa. Good luck!
Thank you very much Che Cheh.i will try this coming Dec n will let u know.
You’re welcome. Can’t wait to see your result. 🙂
https://www.facebook.com/photo.php?fbid=709000259125223&set=a.275979679093952.74989.100000457655069&type=1&theater Che-Cheh,thank you very much for ur teaching.i made mine today with my daughter.u can see the result in my fb.THANK YOU VERY MUCH.without ur blog we wont b able to do it.
Hi, wow congrats! They look good. You’re most welcome. Glad your daughter can help out. 🙂
Wow its amazed me! Fully understand with the steps and processes.i will put this kuih kapit project during cuti sekolah.mahu anak2 I ingat kenangan ini apabila mereka besar nanti.😊
Hi, haha glad the steps are understandable. I agree with you… kenangan manis buat kuih kapit. 🙂
Hi , are you keen to discuss on kuih kapit making demonstration in school?
Hi Crystal, sorry, I don’t think so.